How to manage contract

Start Free Trial

1. This guided demo shows how to manage contracts using Signeasy.

2. ### The left-side panel helps you navigate through different contract stages. **Needs Your Action**: Contracts that require your signature. **Waiting for Others**: Contracts pending signatures from others. **Completed**: All signed contracts. **Lapsed**: Contracts that have expired or were voided.

3. "Click the dropdown beside 'Send for Signature' to choose whether to send the document for signing or sign it yourself."

4. To upload a contract, first click on "**Upload**".

5. Choose your preferred file source. You can upload a contract from your computer or cloud storage (Google Drive or OneDrive).

6. Select the contract you need and click 'Add' to proceed with the signing process.

7. Click on the More options icon to rename or delete the file if needed.

8. Add the signer details, including their name and email in the provided fields.

9. Turn on Signing Order to send the document in a set sequence. Each signer will receive it only after the previous signer has completed their signature.

10. Use the **drag handle** (six-dot icon) to rearrange the signing order and control the sequence of signatures.

11. Click on 'Request Attachments' to collect supporting documents from signers during the signing process.

12. Enable **Two-Step Verification** for an added layer of security, requiring signers to verify their identity before accessing the document. You can also choose to send the document via SMS for quicker access.

13. Click 'Add Signer' to include additional recipients who need to sign the document.

14. When everything is set, click 'Next' to proceed to the signing process.

15. You can now drag and drop the necessary fields into the desired sections of the contract.

16. Click on "**Send for Signature**" once you are done.

17. You've successfully signed a contract and sent it for signature using Signeasy.

18. With SignEasy, you can track contract status, set reminders, view audit trails, modify contracts, decline or void them, and access many more features for seamless contract management.

19. Click on **‘Needs Your Action’** to view contracts that require your signature.

20. Click on the **Status** to see who has signed and who has not which helps in easier management the contracts.

21. The **Last Modified** field displays the date and time of the last update.

22. Click **Sign** to review and complete your signature. You also have the option to **edit, void, or set a reminder** for these contracts.

23. Click on **‘Waiting for Others’** to check contracts pending signatures from others.

24. Click on the status to check signer progress.

25. Use **Remind** 24 hours after the first request to follow up.

26. Signers receive **automated reminders** on Day 1 and Day 7 to complete their signatures.

27. Click on **‘Completed’** to access all signed contracts.

28. In the **Completed** section, click on the "**Download"** button next to the signed contract to download it.

29. You can download the contract in multiple ways: - Signed contract with the audit trail - Only the signed contract - Only the audit trail

30. After selecting your preferred download option, you will see a confirmation message, and the document will be downloaded to your device.

31. Click on ‘Lapsed’ to view contracts that have expired or been voided

32. You can check the status of lapsed contracts under the **Status** tab, which shows who voided the contract.

33. You can check the **Lapsed on** tab for the date and time the contract was lapsed.

34. Click the download icon to save a copy to your device. Use the **More options menu** to delete a lapsed contract permanently.

35. Click on "**All Documents"** to get a full overview, making it easy to manage contracts.

36. The All Documents section lets you track contract statuses like Signed, Waiting, Voided, and Signature Requested for better management.

37. Click on ‘**Templates**’ to create and reuse contract templates.

38. You can find the existing templates here.

39. Click on '**Send for Signature**' to proceed with sending a contract.

40. Click on 'Options' to perform actions such as managing sharing, editing, creating a copy, renaming, or deleting a template.

41. Click on '**Create Template**' to create a new template.

42. Choose your preferred file source to upload your template. You can upload a template from your computer or cloud storage (Google Drive or OneDrive).

43. Add the placeholders details for your signers in the provided field.

44. Add the attachment name in the provided field.

45. Once you create a template, you can click on next.

46. The Reports section provides admins with insights into team-wide document processing and individual usage statistics.

47. Team's Usage provides insights into document completion rates, average time for completion, signature requests, and overall team activity.

48. You can track individual team member's usage and contract status here.

49. You can click on the calendar to customize the date range and filter insights for specific time periods.

50. My Usage helps track personal signature requests, pending documents, and signer actions.

51. Teamspace allows Owners and Admins to view, track, and manage team documents while controlling visibility and permissions.

52. It provides an overview of all documents sent by your team, allowing you to track the sender, monitor contract status, and take action as needed.

53. You’ve successfully managed contracts using Signeasy!

Frequently asked questions

How can I create an online signature for a document?
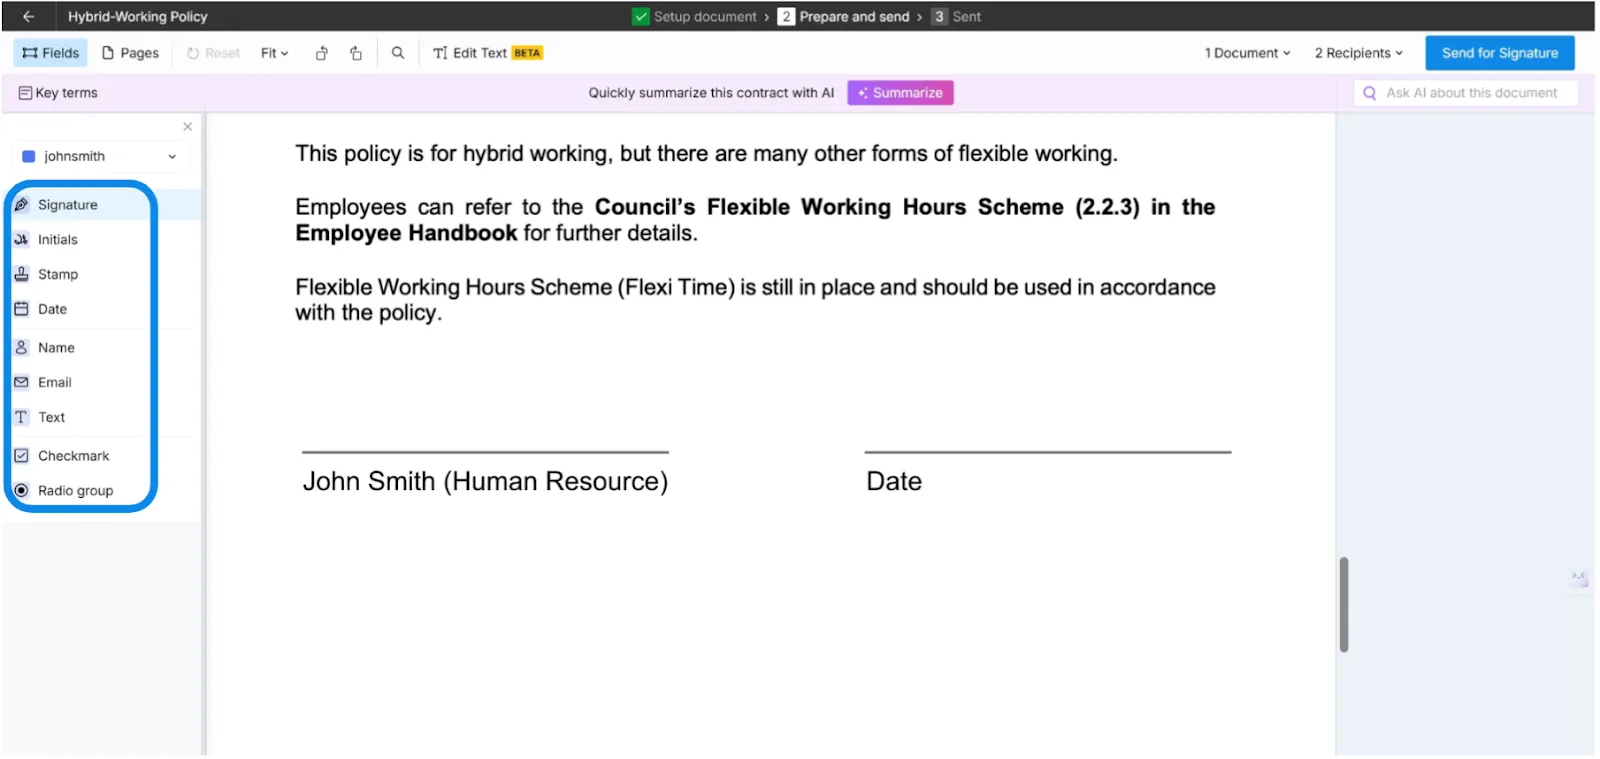
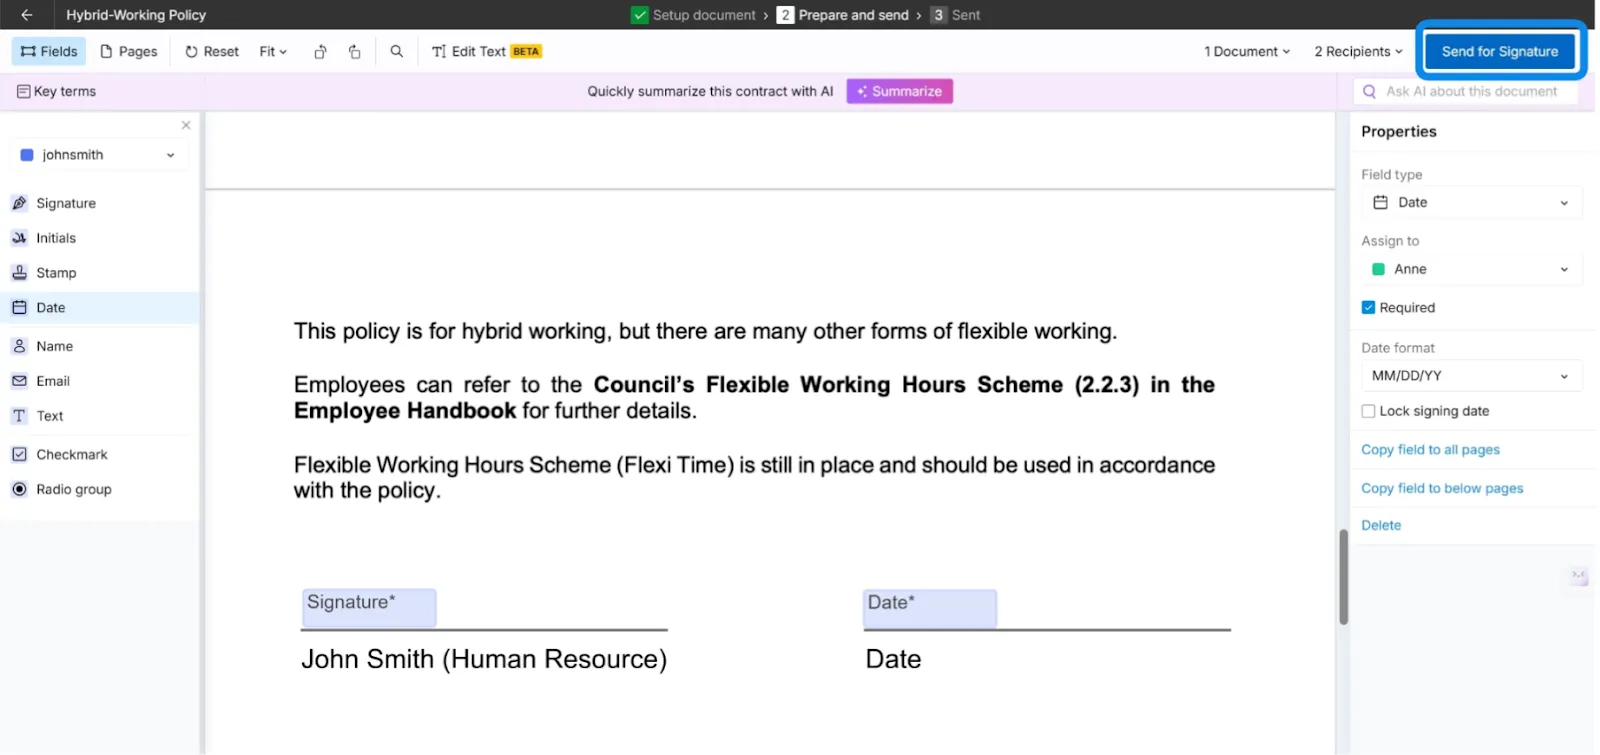
If you are looking to create an online signature for a document, use an eSignature platform like Signeasy. It allows you to draw your signature using a mouse or touchscreen, type it using a preferred font, or upload an image of your handwritten signature. Once created, you can place it on any document and reuse it whenever needed.
How can a document be signed electronically?
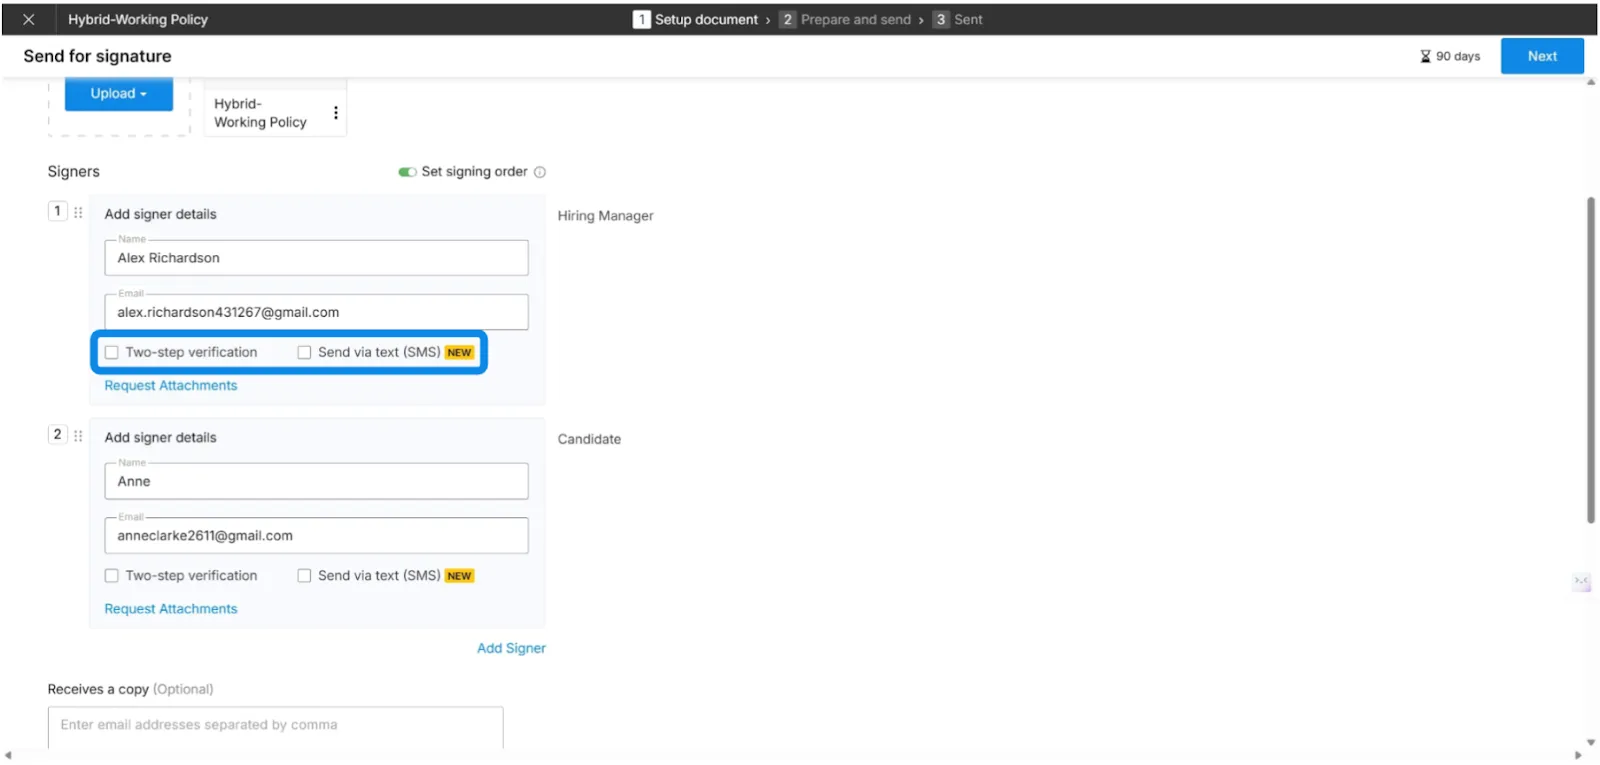
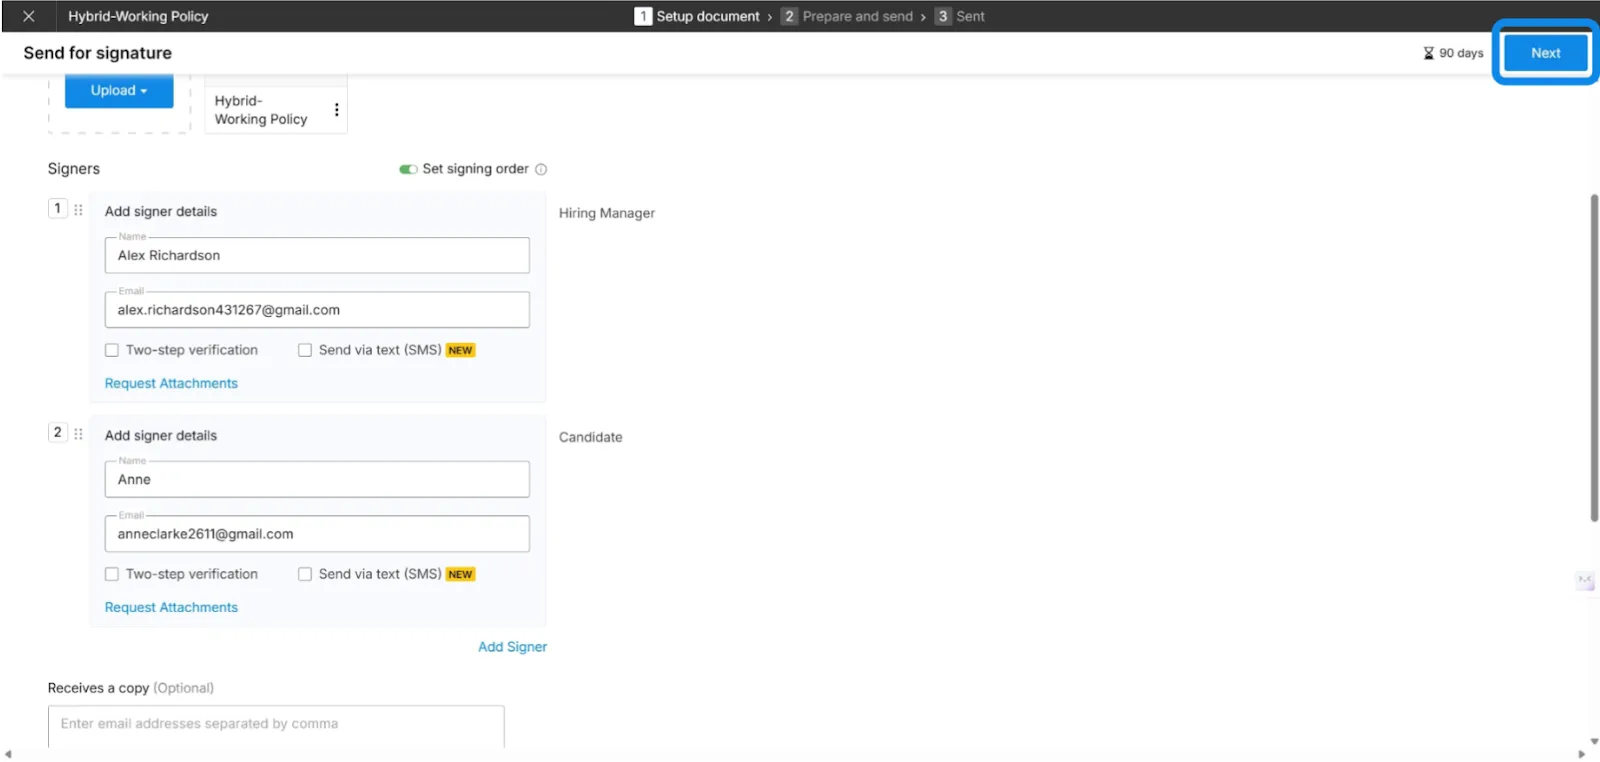
Document can be signed electronically on eSignature platform. One of the many options is Signeasy. It's free and easy to use. Once uploaded, you can add your signature by drawing, typing, or uploading an image. The signature is placed in the required field, and after clicking Finish, the document is securely signed and ready to be shared or downloaded.