After months of hard work and sleepless nights, we are thrilled that Signeasy for Web is finally out. This is a very exciting feature as it gives users the flexibility to now use Signeasy on desktops and notebooks, along with mobiles and tablets. The web app is supported on Internet Explorer, Mozilla Firefox, Google Chrome and Safari, and can be used on both Windows and Mac OS.
Let me give you a walk-through to help you get started with Signeasy for Web.
For a quick overview, check out the video below.
[embed]https://www.youtube.com/watch?v=pIB4yeaMktA[/embed]
The new Signeasy for Web is handy for users who would like to use Signeasy on their desktops and notebooks, along with the existing mobile experience. It supports multiple document formats such as PDF, MS-Office (DOC, DOCX, XLS, XLSX, PPT), Openoffice, Text, HTML, RTF, CSV, and also images (JPG, BMP, PNG, TIFF). Wondering how to insert signature in excel? Signeasy handles XLS and XLSX files effortlessly. Please remember however that the signed files that are exported using Signeasy will be in PDF format. It also allows you to insert initials, dates and text other than signatures.
Who can use Signeasy for Web?
Signeasy for Web can be used by anyone with a desktop or a notebook. To start, go to app.signeasy.com where you will be welcomed by the login screen. If you don’t have a Signeasy account yet, create one using a valid email ID and password. You will need to verify your account from your email address. You can also sign up using your Google account which will allow you to skip the verification process and start immediately.
If you are an existing user, simply log in using your Signeasy credentials and get started. All the documents within your Signeasy app in your mobile/tablet device will be available in the web app as well.
New users will find it easy to navigate and use the web app with the helpful prompts to get you started.
Getting Started : Importing the Documents
Once you log in for the first time, you can find a test document waiting for you to try a sample signature on. You can find visual prompts which show you how to scroll, rotate, zoom and add signatures, initials, date, text and more.
You can import a document by clicking on the Import button on the left side of the dashboard.
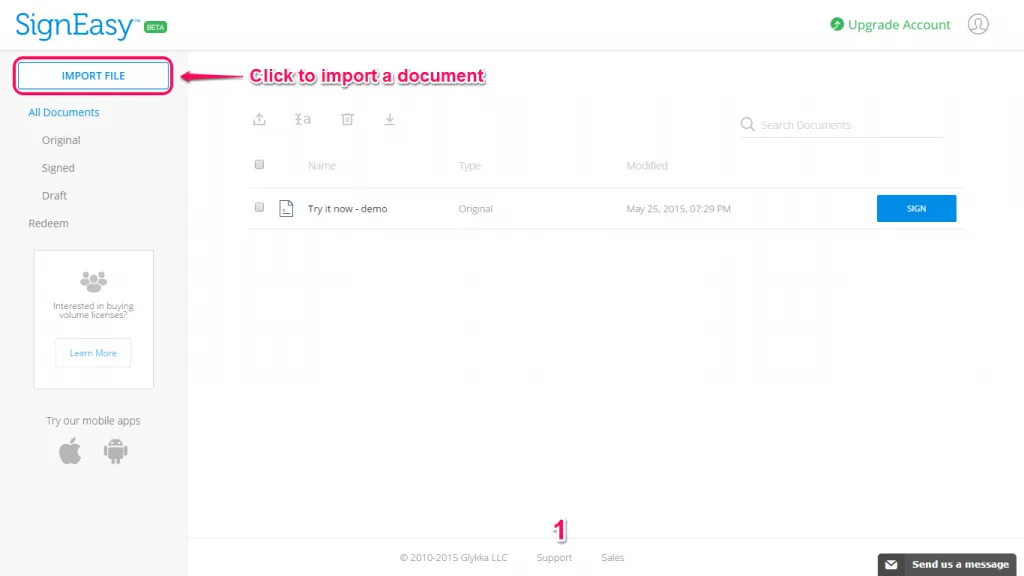
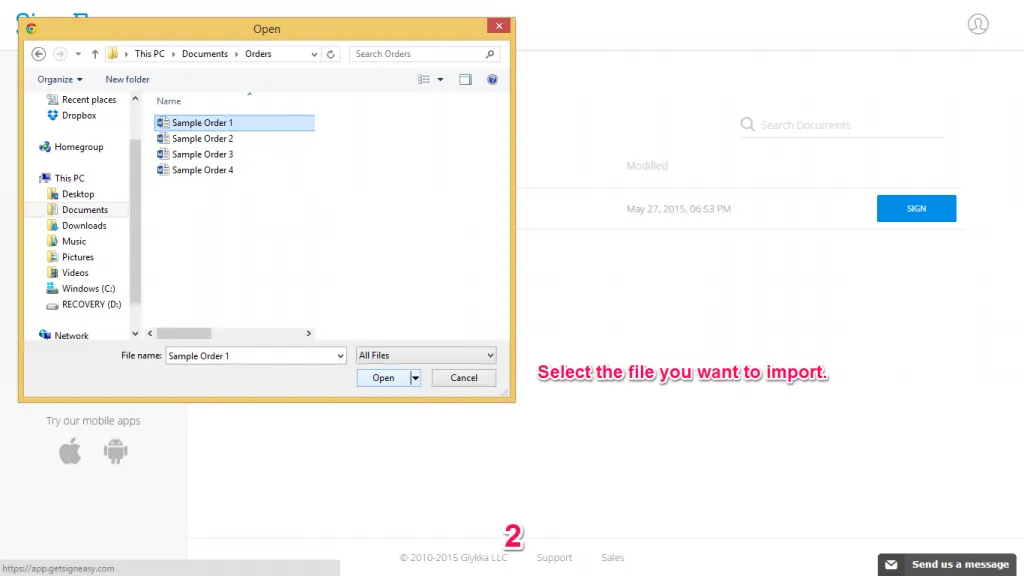
Then select the file you want to import.
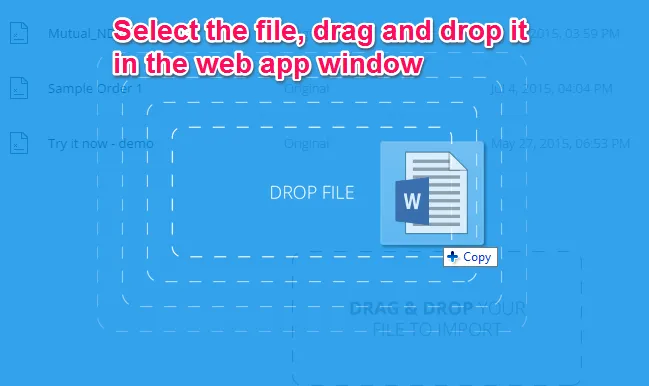
You can also import a document by selecting a file on your file explorer, dragging it into the web app window and dropping it.
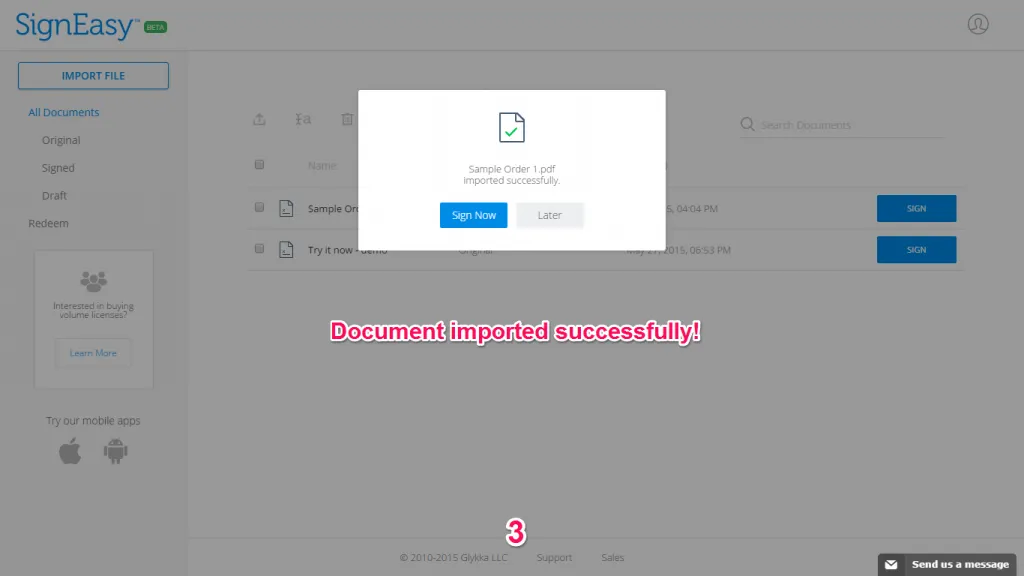
Done! How do I sign the document now?
Click on Signature to input your signature. Choose any one of the Signature options and input your signature by clicking on OK.
You can add as many signatures as you’d like on a document by clicking on the document to add. To stop, hit the Escape key.
For the benefit of our users, we have multiple options for adding signatures.
- Draw
The default option is to draw your signature. You can draw your signature using the mouse or track pad.

Select the ‘Save as primary signature’ checkbox to save the signature for future use.
- Type
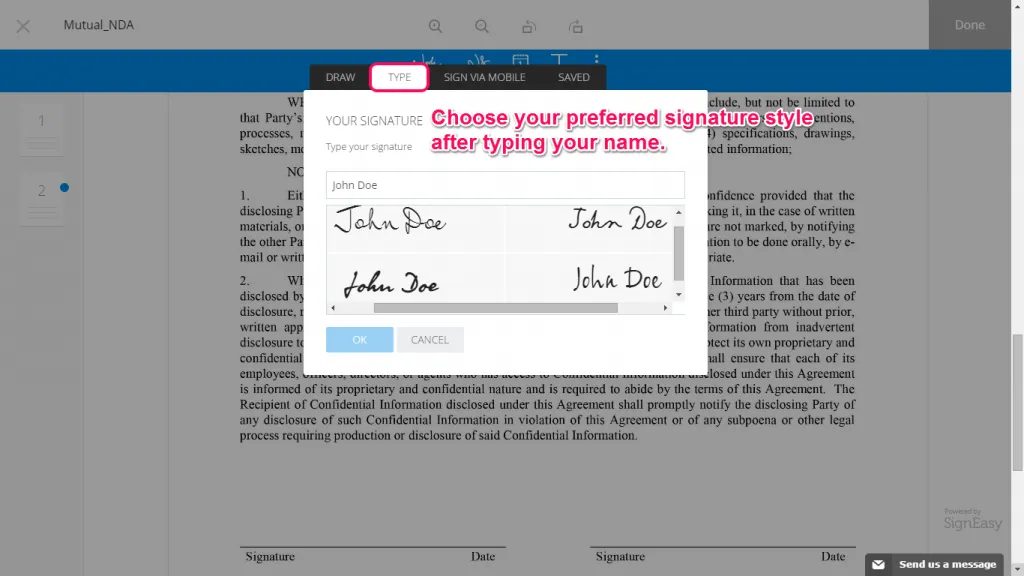
This option allows you to type your name which will be converted into a stylized signature, with four options you can choose from.
- Sign via Mobile
Using this option, you can have a signature link sent to your registered e-mail address.
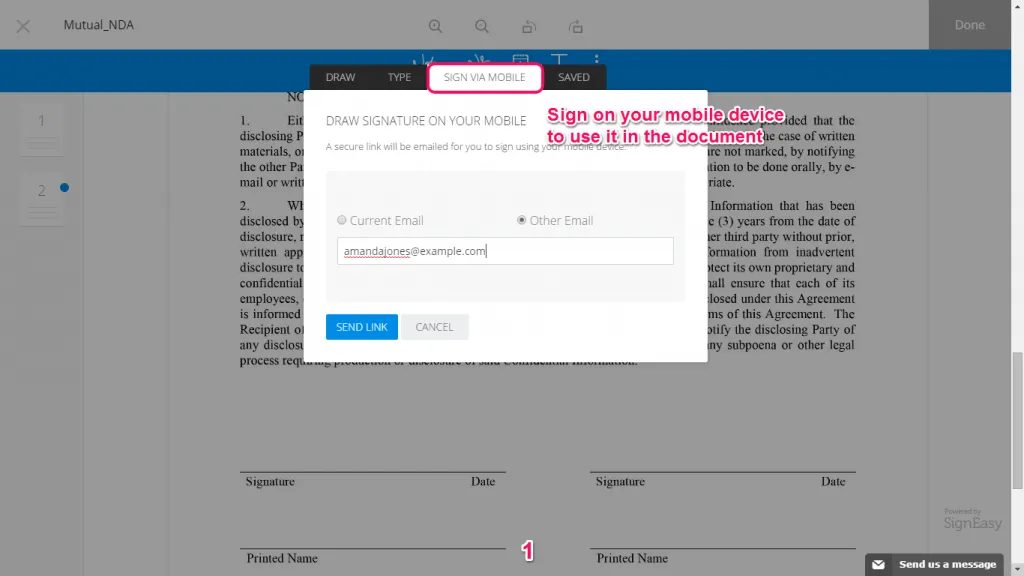
Access the link in your mobile device to get directed to a signature screen in your mobile web browser.


Draw your signature on the screen and once you hit OK, your signature will automatically appear in the desktop browser.

You can select on the checkbox below to save it as your primary signature which you can use later.
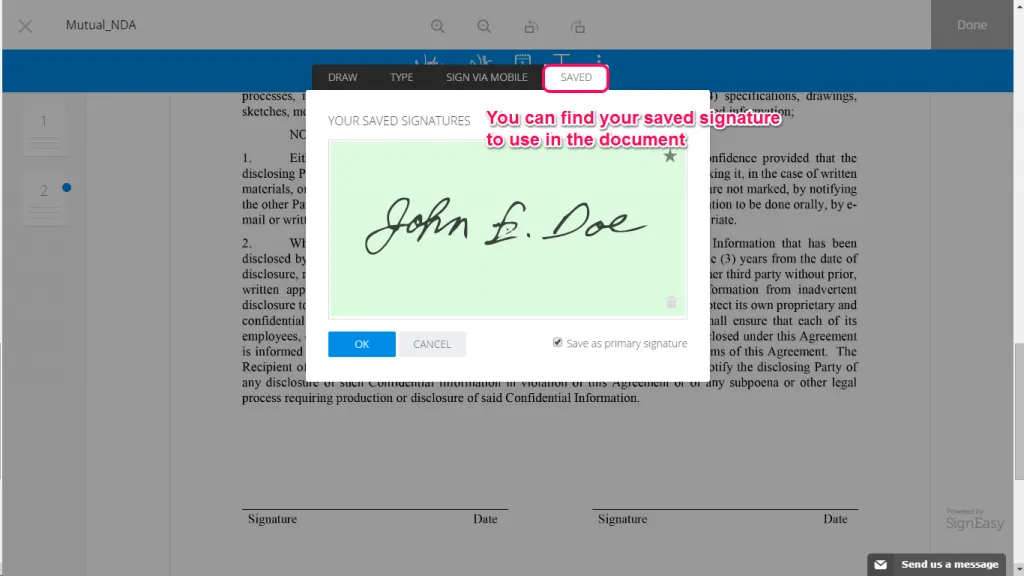
- Saved
If you’ve added a signature before, it will be saved automatically as your primary signature which you can choose instead of having to draw your signature each time. You can also save your signature which was signed using the Sign via Mobile option.
Ok, added my signature too. What’s next?
Signeasy allows you to add more details other than signatures in the document, such as initials, date and text.
Initials
To add your initials, follow the same process with the options for adding signatures.
Date
You can add the current day’s date by selecting the Date option and clicking on the document.
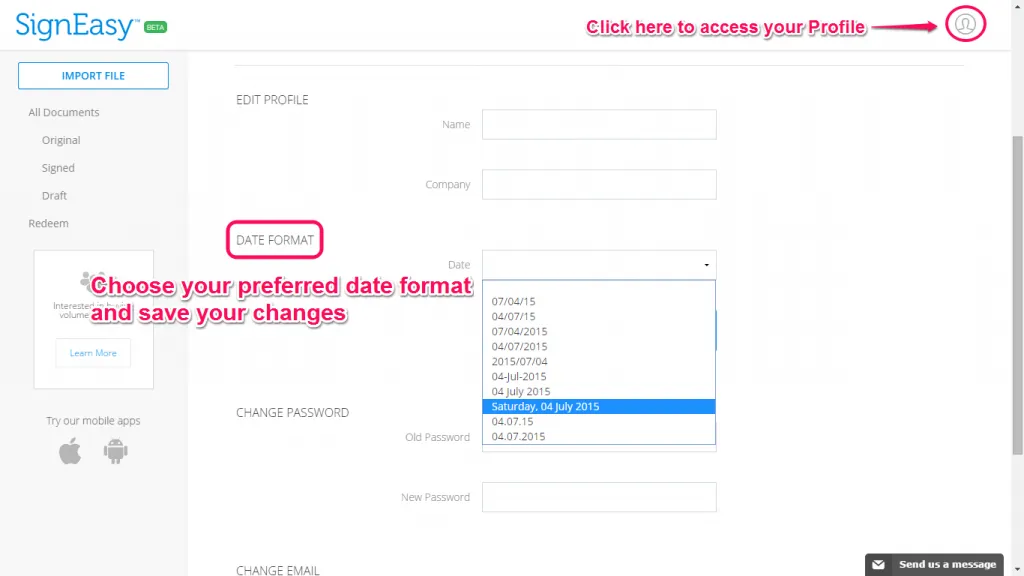
To change the date or date format, you have two options.
1. Editing the date manually by clicking on the Date element and changing it.

Or
2. To change the date format used in the document, go to the document dashboard, click on Profile, where you can view the Account Overview page. You can change the default date format by choosing the preferred format and saving the changes.
Text
Sometimes, while signing documents there will be a need to add text, such as Name, Title, Designation, Address etc. To add text in a document, simply click on the Text icon on top, and then on the document to insert the text box. Type your text and hit Escape to finish.

What if I need to make some changes?
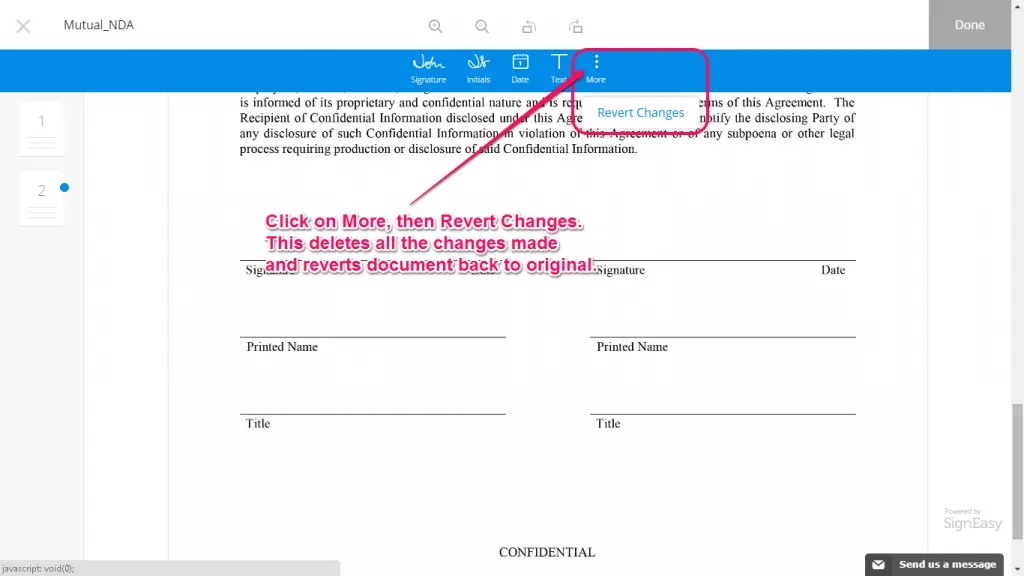
If you’ve made a few mistakes while adding signatures, text or other annotations, and do not want to manually delete each element and want to start from scratch again, use the Revert Changes option by clicking on the More icon. This will clear any additions that were made to the original document, and return it to its original form.
And, sharing the document?
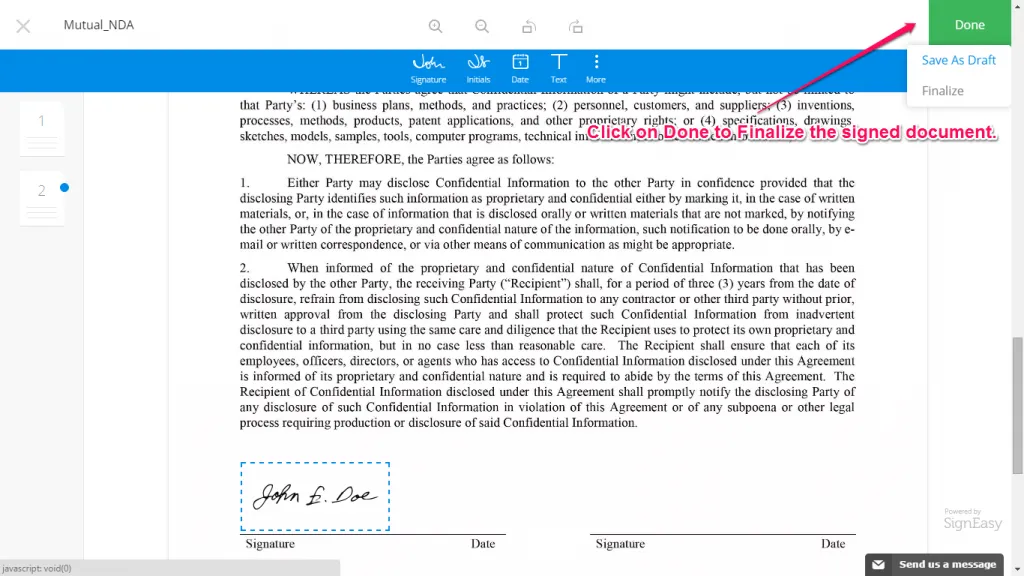
Once you’ve drawn your signature and added it in the document, you can choose to send it right away or save it as a draft.
Click on Done to finalize the document or save as a draft.
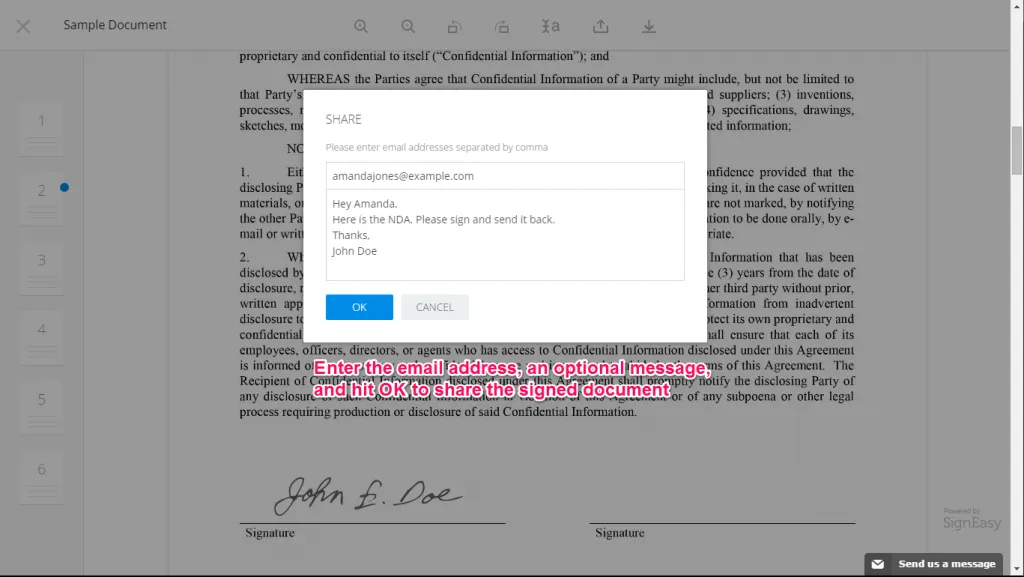
Click on the Share icon to share the document.

Enter the email address of the party with whom you want to share the document. If you have multiple email addresses, you can enter them separated by commas. Add an optional note for the email and when you’re done, click OK to email the documents.
Hope this is useful in helping you get started with the new Signeasy for Web! If you have doubts, check our Support portal, or write to us at support[at]signeasy.com
We would love to have your feedback regarding your web app experience. This would help us understand how you are using the product, and make improvements. We are constantly fine-tuning the product, and your suggestions and opinions are very important to us. If you would like to share your thoughts, drop us a line at hello[at] signeasy.com


